Three.js Camera Hit Test

The one of my project was wralk in 2018, real-time visualization on browsers and one of the problem was 360 degree hit test in scene. I figured it out this problem as I will explain in this post.

Here is demo and source code:

http://wralk.azmicirit.com/demo

http://wralk.azmicirit.com/villavr

https://github.com/azmicirit/wralk/blob/master/wralk.js

     prepareRotationMatrices: function () {
        let rotationMatrixF = new THREE.Matrix4();
        rotationMatrixF.makeRotationY(0);
        this.ROTATION_MATRICES.push(rotationMatrixF);

        let rotationMatrixB = new THREE.Matrix4();
        rotationMatrixB.makeRotationY(180 * Math.PI / 180);
        this.ROTATION_MATRICES.push(rotationMatrixB);

        let rotationMatrixL = new THREE.Matrix4();
        rotationMatrixL.makeRotationY(90 * Math.PI / 180);
        this.ROTATION_MATRICES.push(rotationMatrixL);

        let rotationMatrixR = new THREE.Matrix4();
        rotationMatrixR.makeRotationY((360 - 90) * Math.PI / 180);
        this.ROTATION_MATRICES.push(rotationMatrixR);

        let rotationMatrixU = new THREE.Matrix4();
        rotationMatrixU.makeRotationX(90 * Math.PI / 180);
        this.ROTATION_MATRICES.push(rotationMatrixU);

        let rotationMatrixD = new THREE.Matrix4();
        rotationMatrixD.makeRotationX((360 - 90) * Math.PI / 180);
        this.ROTATION_MATRICES.push(rotationMatrixD);
    },
    hitTest: function () {
        this.unlockAllDirections();
        for (let i = 0; i < 6; i++) {
            let cameraDirection = this.getDirection(new THREE.Vector3(0, 0, 0), this, (i > 3)).clone();
            let direction = cameraDirection.clone();
            direction.applyMatrix4(this.ROTATION_MATRICES[i]);
            let rayCaster = new THREE.Raycaster(this.getObject().position, direction, 0.1, 50);
            let intersects = rayCaster.intersectObjects(this.COLLIDABLE_OBJS);
            if (intersects.length > 0 && intersects[0].distance < this.HIT_DISTANCE) {
                this.lockDirectionByIndex(i);
            }
        }
    }

First of all we need to setup matrices (6 axis) for all around camera like a box: Up, Down, Left, Right, Front and Back.

call function prepareRotationMatrices();

call funtion hitTest(); every render cycle

Then get camera direction as Vector (3-D) to apply these matrices to test intersects.

direction.applyMatrix4(this.ROTATION_MATRICES[i]);

We will lock directions which vectors are.

this.HIT_DISTANCE = 150;

this.COLLIDABLE_OBJS = [];  // Only collidable objects can be intersected

let rayCaster = new THREE.Raycaster(this.getObject().position, direction, 0.1, 50);

let intersects = rayCaster.intersectObjects(this.COLLIDABLE_OBJS);

if (intersects.length > 0 && intersects[0].distance < this.HIT_DISTANCE) {

  this.lockDirectionByIndex(i);

}

‘this’ references to PointerLockControl. We can replace it with any Object3D.
this.getObject() // PointerLockController.js
https://threejs.org/examples/js/controls/PointerLockControls.js

https://threejs.org/docs/#api/en/core/Raycaster


Ubuntu Server 16.04 Some Helpful Softwares and Configurations After Fresh Install

I’m using some popular softwares and tools after fresh installation of Ubuntu Server.

To Add Swap Space if there haven’t. Swap size is variable to needs. For example server has 2GB RAM so we can give also 2GB to swap size.

sudo fallocate -l 2G /swap
sudo chmod 600 /swap
sudo mkswap /swap
sudo swapon /swap
sudo swapon --show
Output:
NAME TYPE SIZE USED PRIO 
/swap file 2048M 0B -1

Install text editor which is your best. My favorite one is Nano.

sudo apt-get install nano


Compression Software as 7zip is very fast.

sudo apt-get install p7zip-full
7z x rarfile.rar


Get a static IP for your server

sudo nano /etc/network/interfaces
auto lo eth0
iface lo inet loopback
iface eth0 inet static
        address xxx.xxx.xxx.xxx (192.168.1.50)
        netmask xxx.xxx.xxx.xxx (255.255.255.0)
        gateway xxx.xxx.xxx.xxx (192.168.1.1, router address)


For monitoring process, htop is also good.

sudo apt-get install htop


Installing Oracle Java JDK

sudo apt-get install python-software-properties
sudo add-apt-repository ppa:webupd8team/java
sudo apt-get update
sudo apt-get install oracle-java8-installer


Installing Node.js, https://github.com/nodesource/distributions

curl -sL https://deb.nodesource.com/setup_6.x | sudo -E bash -
sudo apt-get install -y nodejs
 

Bluetooth for Internet of Things

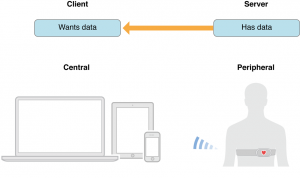
Bluetooth (LE) 4.0+ was introduced in 2011 and it is growing day by day. Smart applications can be powered by Bluetooth with its low energy functionality.  Today, many smart devices support Bluetooth LE.  Low energy consumption is mainly advantage of this technology. It comes with Client-Server concept .

CBDevices1_2x

As in picture, Client which may be your smart phone or tablet, wants data from server such as your heart rate controller. So now heart rate controller will generate datas at a certain times every heart beat. In this senario, server(heart beat controller) is advertising when it wants to connent to client and client(phone, tablet, …) is scanning for new devices. “Advertising” may contain data or may not.

Central devices(clients) can connect to many peripherals(smart watch, heartbeat or temperature sensor).


Bluetooth terminologies

Services: These functions or capabilities are provided by Bluetooth and non Bluetooth devices, they can be “profiles” or “services” like printing, internet access, etc.

Characteristic: A data value transferred between client and server, for example, the current battery voltage.

Descriptor: Descriptors are optional and each characteristic can have any number of descriptors. Characteristics are defined attribute types that contain a single logical value.

Identifiers: Services, characteristics, and descriptors are collectively referred to as attributes, and identified by UUIDs.
Node.js Libraries

Bleno (Peripheral): https://github.com/sandeepmistry/bleno

Noble (Central): https://github.com/sandeepmistry/noble


Intel Edison supports Javascript. Here is link for more detail.

https://software.intel.com/en-us/node-js-templates-for-intel-xdk-iot-edition


Sample Javascript Code

var noble = require(‘noble’);

noble.on('stateChange', function(state) {
 if (state === 'poweredOn') {
   noble.startScanning();
 } else {
   noble.stopScanning();
 }
});

noble.on('discover', function(peripheral) {

 peripheral.on('disconnect', function() {
   process.exit(0);
 });

 peripheral.connect(function(error) {
   peripheral.discoverServices([], function(errServices, services) {
     services.forEach(function(service) {
       service.discoverCharacteristics([], function(errCharateristic, characteristics) {
         characteristics.forEach(function(characteristic) {
           characteristic.on("read", function(data, isNotification) {
             console.log(data.toString("utf-8”));
           });
         });
       });
     });
   });
 });

});
 

MQTT

MQTT is very popular in the internet today. First version of the protocol was authored by Andy Standord-Clark and Arlen Nipper, IBM in 1999. Minimum battery loss and bandwidth and lightweight was primarily use case. There are no queues messaging. It is publish-subscribe based, build on top of TCP/IP messaging protocol. Today many embedded devices communicate with MQTT.

I’m working on MQTT for the last 3 months and I’ve decided to run a broker on my Raspberry Pi.

What is Broker?

Basically brokers carry out messages using publish/subscribe model. The main tasks of broker is responsible for receiving all messages, filtering and accessing control that decide who can let in or not. Also it holds some clients sessions persisted in-memory or optionally in databases (SQLite, MySQL, etc). These are some popular brokers.


My choice is Mosca to try. Normally I use Mosquitto broker but I’m really curious to use Javascript based broker. I’m not sure how fast as Mosquitto. I’ll let it try on my Raspberry Pi.


Here is link:   http://mosca.azmicirit.com


Calculate earth-fixed coordinates with MEMS Inertial Motion Sensors

What is The Inertial Frame?

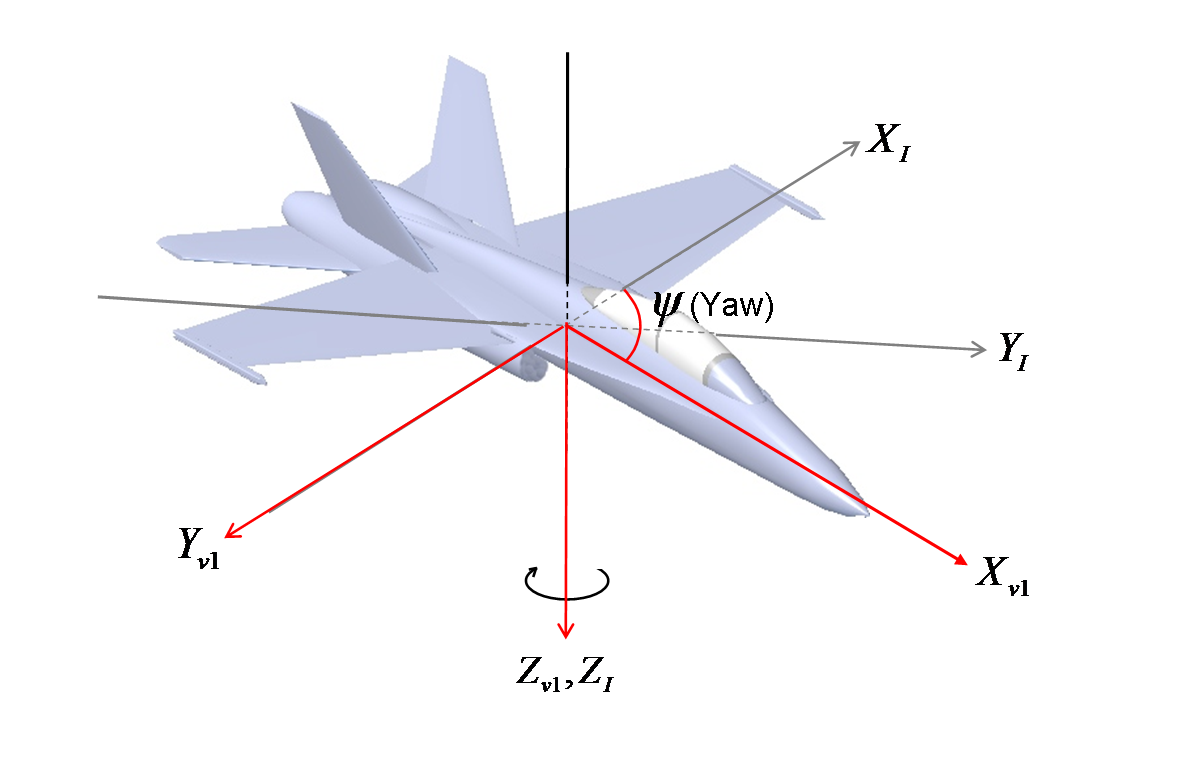
In Classic Mechanic Physics, Inertial frames are time independent, earth-fixed set of axes is used as an unmoving reference.

In my application, I’ve used FIS1100 MEMS Sensors that incorporates a 3-axis gyroscope and accelerometer also connected an external 3-axis magnetometer. As inertial frame where x-axis points east, y-axis points magnetic north pole and z-axis points along gravity.

Vehicle1Frame

Taking into account magnetic variation I had to calculate earth-fixed coordinate from inertial frames. So there are some calculation functions in javascript.

Calculation.eulerAngles = function(x, y, z) {
  var r = Math.sqrt(Math.pow(x, 2) + Math.pow(y, 2) + Math.pow(z, 2));
  var za = Math.acos(z / r);
  var xa = Math.atan(y / x);
  if(isNaN(za)) za = 0;
  if(isNaN(xa)) xa = 0;
  return {
    r: r,
    za: za,
    xa: xa
  };
}

Here is more detail about Euler Angles.


Length of a degree of longitude

This formula may be necessary when converting spatial coordinates to earth fixed coordinates. But always it needs a initial point to calculate all coordinates.

Formula

Meter as distance of 1 degree longitude 
x = 1 / 1000 * (111.320 * cos(deg2rad(latitude)))

phi    delta LAT    delta LONG
0°     110.574 km    111.320 km
15°    110.649 km    107.551 km
30°    110.852 km    96.486 km
45°    111.132 km    78.847 km
60°    111.412 km    55.800 km
75°    111.618 km    28.902 km
90°    111.694 km    0.000 km

IMG_0814

Haversine formula for distance of two coordinates

var R = 6371000; // meters
var φ1 = lat1.toRadians();
var φ2 = lat2.toRadians();
var Δφ = (lat2-lat1).toRadians();
var Δλ = (lon2-lon1).toRadians();

var a = Math.sin(Δφ/2) * Math.sin(Δφ/2) +
        Math.cos1) * Math.cos2) *
        Math.sin(Δλ/2) * Math.sin(Δλ/2);
var c = 2 * Math.atan2(Math.sqrt(a), Math.sqrt(1-a));

var d = R * c;
 

MongoDB Installation, Ubuntu 14.04 LTS

There are some production notes about mongodb version 3.2 before install.

https://docs.mongodb.org/manual/administration/production-notes/

Installation on Ubuntu

sudo apt-key adv --keyserver hkp://keyserver.ubuntu.com:80 --recv EA312927

echo "deb http://repo.mongodb.org/apt/ubuntu trusty/mongodb-org/3.2 multiverse" | sudo tee /etc/apt/sources.list.d/mongodb-org-3.2.list

sudo apt-get update

For latest stable version:
sudo apt-get install -y mongodb-org

For specific release of MongoDB:
sudo apt-get install -y mongodb-org=3.2.0 mongodb-org-server=3.2.0 mongodb-org-shell=3.2.0 mongodb-org-mongos=3.2.0 mongodb-org-tools=3.2.0

Service:
sudo service mongod start/stop/restart

Mongo Command Line:
$ mongo
MongoDB shell version: 3.2.0
connecting to: test
>

Port of mongod service: 27017

Mongod Log Location:           /var/log/mongodb
Mongod Installation Location:  /var/lib/mongodb

After Ubuntu 16.04 there is no service to start MongoDB. We just need to edit some service configuration.

Open a new text then edit as below.

sudo nano /etc/systemd/system/mongodb.service

[Unit]
Description=High-performance, schema-free document-oriented database
After=network.target

[Service]
User=mongodb
ExecStart=/usr/bin/mongod --quiet --config /etc/mongod.conf

[Install]
WantedBy=multi-user.target
sudo systemctl start mongodb

Sample Init Script For mongos Service

#!/bin/bash

### BEGIN INIT INFO
# Provides:        MongoDB Config Server
# Required-Start:  $network
# Required-Stop:   $network
# Default-Start:   2 3 4 5
# Default-Stop:    0 1 6
# Short-Description: Start/Stop MongoDB Config server
### END INIT INFO

start() {
        /usr/bin/mongos --configdb 192.168.3.187:27018 --port 27019 &
}

stop() {
        for a in `ps -ef | grep 27018 | awk '{print $2}'`; do kill -9 $a; done
}

case $1 in
  start|stop) $1;;
  restart) stop; start;;
  *) echo "Run as $0 <start|stop|restart>"; exit 1;;
esac
sudo update-rc.d mongos defaults

Problem of  WARNING: /sys/kernel/mm/transparent_hugepage/enabled is ‘always’

sudo nano /etc/init/mongod.conf

    // add after 'chown $DEAMONUSER /var/run/mongodb.pid'  //

    if test -f /sys/kernel/mm/transparent_hugepage/enabled; then
       echo never > /sys/kernel/mm/transparent_hugepage/enabled
    fi
    if test -f /sys/kernel/mm/transparent_hugepage/defrag; then
       echo never > /sys/kernel/mm/transparent_hugepage/defrag
    fi

    // and before 'end script' //

sudo service mongod restart

Adding some users (Role-based)

$ mongo

use admin

db.createUser(
    {
      user: "root",
      pwd: "abc1234",
      roles: [ "root" ]
    }
)

use mqtt

db.createUser(
    {
      user: "mqttUser",
      pwd: "abc1234",
      roles: [ { role: "readWrite", db: "mqtt" } ]
    }
)

Enable Role Based Authentication

security:
   authorization: enabled

Sample Connection of mongod Service

mongo --host 192.168.1.50 --port 27017 -u root -p abc1234 --authenticationDatabase admin

Diagram of mongo Services

mongo

Enable Internal Authentication

openssl rand -base64 741 > mongodb-keyfile
sudo su
$ root
mkdir /srv/mongodb
openssl rand -base64 741 > /srv/mongodb/mongodb-keyfile
chmod 600 /srv/mongodb/mongodb-keyfile
chown mongodb:mongodb mongodb-keyfile
exit
$ username

Deploy a Replicated Config Servers

security:
  keyFile: /srv/mongodb/mongodb-keyfile

sharding:
   clusterRole: configsvr

replication:
   replSetName: configReplSet

Deloy a Replicated Shard Servers

security:
  keyFile: /srv/mongodb/mongodb-keyfile

sharding:
   clusterRole: shardsvr

replication:
   replSetName: shardReplSet

Initiate the Replica Sets

rs.initiate()
rs.conf({
  _id: <string>,
  version: <int>,
  protocolVersion: <number>,
  members: [
    {
      _id: <int>,
      host: <string>,
      arbiterOnly: <boolean>,
      buildIndexes: <boolean>,
      hidden: <boolean>,
      priority: <number>,
      tags: <document>,
      slaveDelay: <int>,
      votes: <number>
    },
    ...
  ],
  settings: {
    chainingAllowed : <boolean>,
    heartbeatIntervalMillis : <int>,
    heartbeatTimeoutSecs: <int>,
    electionTimeoutMillis : <int>,
    getLastErrorModes : <document>,
    getLastErrorDefaults : <document>
  }
})
rs.status()

For more details: https://docs.mongodb.org/manual/reference/replica-configuration/

Adding some members 

rs.add("mongodb1.example.net")
rs.add("mongodb2.example.net")

Start to mongos Services

mongos --configdb configReplSetName/<cfgsvr1:port1>,<cfgsvr2:port2>,<cfgsvr3:port3>

Add Shards to the Cluster 

$ mongo --host <hostname of machine running mongos> --port <port mongos listens on>
sh.addShard( "shardReplSet/mongodb0.example.net:27017" )
sh.enableSharding("<database>")
sh.shardCollection("<database>.<collection>", shard-key-pattern)

Example of shard-key pattern is

{ "zipcode": 1, "name": 1 }
sh.status()


OSM Tiles Installation

System Requirements

Hardware
A minimum of 1GB of RAM is required or installation will fail. For a full planet import 32GB or more are recommended.

For a full planet install you will need about 500GB of hard disk space (as of May 2015, take into account that the OSM database is growing fast). SSD disks will help considerably to speed up import and queries.

On pummelzacken the complete initial import requires around 2 days. On a 12-core machine with 32GB RAM and standard SATA disks, the initial import (osm2pgsql) takes around 20 hours and the indexing process another 250 hours. Only 8 parallel threads were used for this setup because I/O speed was the limiting factor. The same machine is able to import the Germany extract in around 4 hours.

Pre-Installments

sudo apt-get install libboost-all-dev subversion git-core tar unzip wget bzip2 build-essential autoconf libtool libxml2-dev libgeos-dev libgeos++-dev libpq-dev libbz2-dev libproj-dev munin-node munin libprotobuf-c0-dev protobuf-c-compiler libfreetype6-dev libpng12-dev libtiff4-dev libicu-dev libgdal-dev libcairo-dev libcairomm-1.0-dev apache2 apache2-dev libagg-dev liblua5.2-dev ttf-unifont lua5.1 liblua5.1-dev node-carto

sudo apt-get install geotiff-bin

sudo apt-get install libgeotiff-dev

sudo apt-get install postgresql postgresql-contrib postgis postgresql-9.3-postgis-2.1

Adding a New Postgre User 

sudo -u postgres -i
createuser username # answer yes for superuser (although this isn't strictly necessary)
createdb -E UTF8 -O username gis
exit

Be careful with what you type in username. It will need later.

Postgres Tables

sudo -u postgres psql
\c gis
CREATE EXTENSION postgis;
ALTER TABLE geometry_columns OWNER TO username;
ALTER TABLE spatial_ref_sys OWNER TO username;
\q
exit

Installation of OSM2PGSQL

mkdir ~/src
cd ~/src
git clone git://github.com/openstreetmap/osm2pgsql.git
cd osm2pgsql
mkdir build && cd build
cmake ..
make
sudo make install

Installation of Mapnik

sudo apt-get install -y python-software-properties

sudo add-apt-repository ppa:mapnik/nightly-2.3
sudo apt-get update
sudo apt-get install libmapnik libmapnik-dev mapnik-utils python-mapnik
# also install datasource plugins if you need them
sudo apt-get install mapnik-input-plugin-gdal mapnik-input-plugin-ogr mapnik-input-plugin-postgis mapnik-input-plugin-sqlite mapnik-input-plugin-osm

Checking Mapnik Installation in Python

python
>>> import mapnik
>>> quit()

Installation of mod_tile and Renderd

Install mod_tile and renderd:
cd ~/src
git clone git://github.com/openstreetmap/mod_tile.git
cd mod_tile
./autogen.sh
./configure
make
sudo make install
sudo make install-mod_tile
sudo ldconfig

Installation of Stylesheet (OSMBright)

Also available other themes are TileMill , Kosmtik , Sputnik

mkdir -p /usr/local/share/maps/style
cd /usr/local/share/maps/style
wget https://github.com/mapbox/osm-bright/archive/master.zip
wget http://data.openstreetmapdata.com/simplified-land-polygons-complete-3857.zip
wget http://data.openstreetmapdata.com/land-polygons-split-3857.zip
wget http://www.naturalearthdata.com/http//www.naturalearthdata.com/download/10m/cultural/ne_10m_populated_places_simple.zip

Downloading Shapes

unzip '*.zip'
mkdir osm-bright-master/shp
mv land-polygons-split-3857 osm-bright-master/shp/
mv simplified-land-polygons-complete-3857 osm-bright-master/shp/
mv ne_10m_populated_places_simple osm-bright-master/shp/

Indexing to Improve Performances

cd osm-bright-master/shp/land-polygons-split-3857
shapeindex land_polygons.shp
cd ../simplified-land-polygons-complete-3857/
shapeindex simplified_land_polygons.shp
cd ../

Location of local data files

nano osm-bright/osm-bright.osm2pgsql.mml

Replace all values start with ‘http://’

"file": "/usr/local/share/maps/style/osm-bright-master/shp/land-polygons-split-3857/land_polygons.shp", 
"type": "shape" 

"file": "/usr/local/share/maps/style/osm-bright-master/shp/simplified-land-polygons-complete-3857/simplified_land_polygons.shp", 
"type": "shape",

"file": "/usr/local/share/maps/style/osm-bright-master/shp/ne_10m_populated_places_simple/ne_10m_populated_places_simple.shp", 
"type": "shape"

Finally, replace sections that are ‘srs’ and ‘srs_name’ with

"srs": "+proj=longlat +ellps=WGS84 +datum=WGS84 +no_defs"

Run in /osm-bright-master/

cp configure.py.sample configure.py
nano configure.py

Replace “~/Documents/Mapbox/project” line with “/usr/local/share/maps/style” and change database name ‘osm’ to ‘gis’.

Editing /usr/local/etc/renderd.conf 

socketname=/var/run/renderd/renderd.sock
plugins_dir=/usr/lib/mapnik/input
font_dir=/usr/share/fonts/truetype/ttf-dejavu
XML=/usr/local/share/maps/style/OSMBright/OSMBright.xml
HOST=localhost

Configuring mod_tile

sudo mkdir /var/run/renderd
sudo chown username /var/run/renderd
sudo mkdir /var/lib/mod_tile
sudo chown username /var/lib/mod_tile

username must be same as before

Adding Apache Module

Open /etc/apache2/conf-available/mod_tile.conf as sudo and adding this line

LoadModule tile_module /usr/lib/apache2/modules/mod_tile.so

Editing Apache Configuration

Open /etc/apache2/sites-available/000-default.conf as sudo and adding these lines after admin email address

LoadTileConfigFile /usr/local/etc/renderd.conf
ModTileRenderdSocketName /var/run/renderd/renderd.sock
# Timeout before giving up for a tile to be rendered
ModTileRequestTimeout 0
# Timeout before giving up for a tile to be rendered that is otherwise missing
ModTileMissingRequestTimeout 30

Apply the changes

sudo a2enconf mod_tile
sudo service apache2 reload

Tuning the system

sudo nano /etc/postgresql/9.3/main/postgresql.conf

shared_buffers = 128MB
checkpoint_segments = 20
maintenance_work_mem = 256MB
autovacuum = off

sudo nano /etc/sysctl.conf

# Increase kernel shared memory segments - needed for large databases
kernel.shmmax=268435456

After reboot your system, you can check to kernel definition

sudo sysctl kernel.shmmax
268435456

Downloading Maps

From http://planet.openstreetmap.org/ or http://download.geofabrik.de/

mkdir /usr/local/share/maps/planet
cd /usr/local/share/maps/planet
wget http://download.geofabrik.de/europe/turkey-latest.osm.pbf

Loading data to database

osm2pgsql --slim -d gis -C 256 -S /home/ubuntu/src/osm2pgsql/default.style --number-processes 3 ~/planet/planet-latest.osm.pbf

Change planet-lastest.som.pdf file with whatever your file is downloaded.

After passed without error, screen would show

Completed planet_osm_point
Completed planet_osm_roads
Completed planet_osm_polygon
Completed planet_osm_line
Stopped table: planet_osm_ways

Osm2pgsql took 86400s overall

Running Server

sudo mkdir /var/run/renderd
sudo chown username /var/run/renderd
sudo -u username renderd -f -c /usr/local/etc/renderd.conf
service apache2 reload

If everthing is fine, a small png picture will be appear after browsing ‘http://yourserveraddress/osm_tiles/0/0/0.png’.

Setting to startup scripts

sudo cp  ~/src/mod_tile/debian/renderd.init /etc/init.d/renderd
sudo chmod u+x /etc/init.d/renderd

sudo nano /etc/init.d/renderd"
DAEMON=/usr/local/bin/$NAME
DAEMON_ARGS="-c /usr/local/etc/renderd.conf" 

Replace ‘www-data’ username with whatever you defined before.

sudo /etc/init.d/renderd start
sudo ln -s /etc/init.d/renderd /etc/rc2.d/S20renderd

Now we can reboot the system then good luck with that new tile server 🙂


Source: https://switch2osm.org/why-switch/